Either way, you put the same amount
of water into the glass, right? The difference between the two choices comes from
two variables. How much you opened up the faucet and how long you let the water
run. A small opening required more running time than the large opening did. Or
you could turn that around and say if you wanted to let the water run a long time,
you HAD to use a small opening.
Cameras work the same way, except that
instead of filling a glass with water, you're "pouring" light onto the
film (or the digital sensor, for digicams). Instead of filling a glass, you're
allowing enough light to come into the camera to create a properly exposed image.
Not too much light, not too little - just enough to give you a good shot. To do
that you open your shutter (the faucet in the above analogy) and the time you
let the light (the water in the analogy) come flooding in is how long you leave
that shutter open.
When you take a picture, you push the shutter release.
The shutter opens, allowing the light to pour into the camera. If the shutter
opens very slightly, only a small amount of light is allowed in, and you'll have
to leave that shutter open longer to allow in the proper amount of light. On the
other hand, if you open the shutter wide open, much more light comes in and you
don't have to leave it open nearly as long to get the proper amount of light.
This shutter opening is called the aperture. How long you leave the shutter
open is called the shutter speed. With a good camera, you can control the aperture
and the shutter speed. As you take photographs, you are continuously striking
a balance between aperture and shutter speed to use the advantages and limitations
of each while creating properly exposed images.
So why would you care if
you're using a small aperture or large, or a fast shutter speed or slow?
Shutter
speed
Let's start with shutter speed, because that's easier to explain.
While your camera is taking a picture, while that shutter is open, anything
being photographed that moves will be blurry. Your eyes don't see it as a blur,
but the camera will - like smearing paint across a canvas. You've seen pictures
like that before, where someone moved while the picture was being taken and they're
all blurry.
Let's say you're taking a picture of a race car going past
you at 200 miles per hour. In that situation, do you want a slow shutter speed
or fast? Well, that depends. You've seen pictures where everything is in focus
but the car is a blur. It's a nice effect - You can just feel the motion of that
car in pictures like that. In those pictures, the photographer used a slow shutter
speed - for example, maybe he shot the picture at 1/60th of a second. During that
1/60th of a second, the car racing past at 200 mph actually moved about 4.9 feet,
while everything else around it was sat still - so the car is a blur and everything
else is very sharp.
On the other hand, if you wanted that race car to be
nice and sharply focused, you'd have to shoot with as quick a shutter speed as
possible to "freeze" the action and reduce blur. So if you shot the
picture at 1/1000th of a second, the car doesn't have much time at all to move
- it actually travels only a couple inches. It's sharp and everything else is
too.
Now, looking at those two examples . . . in the first, where the photographer
shot at 1/60th second so the race car would be a blur, that means the shutter
was open longer - so that means he had to use a smaller aperture to ensure he
didn't allow too much light in. To freeze the action he used a fast shutter speed
like 1/1000th of a second. That means he'd have to open the aperture wider to
allow enough light in.
In either instance, he had to let the same amount
of light in to get a properly exposed image. It was just a question of whether
he wanted to freeze the action or let the car be blurred. He controlled that decision
with the shutter speed, and the shutter speed dictated what aperture he would
use.
Here is a picture taken with a fast shutter speed to freeze the action:
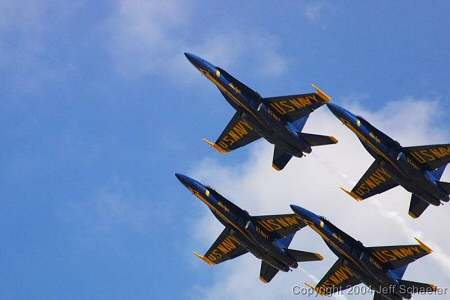
You
can tell this was taken very fast; I was able to freeze the planes in mid air
so you can read the words on the wings.
Here is a photo of my nephew, Shane,
taken with a slower shutter speed, to show the motion:
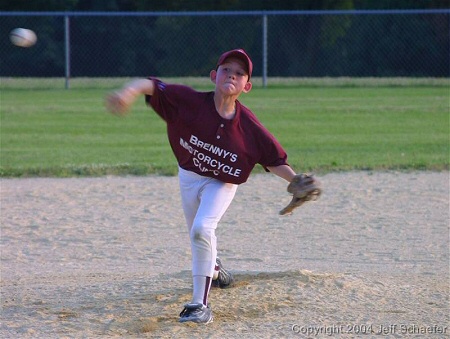
Shane
is a good pitcher, but his fastball doesn't move as quickly as those jets in the
previous picture. But notice how his arm and the ball are blurred when the jets
were not blurred at all? This is because the shutter speed in the baseball picture
was slower than the jet picture.
When you are shooting a moving subject,
you will probably want to shoot in Shutter Preferred Mode rather than Programmed
Mode or Fully Automatic. Shutter Preferred (it will be labeled TV on your camera)
means that you pick the shutter speed and the camera adjusts the aperture. So
if you wanted to freeze that sports car you would pick a shutter speed of 1/1000th
and fire away - if the camera is set on TV it will set the aperture for you. Likewise,
if you want the car to be a blur you would set your shutter speed at 1/60th -
again, the camera will do the work of calculating what aperture you need. Point-and-shoot
cameras normally have different modes - if your camera doesn't allow you to control
aperture or shutter speed, you would shoot in Sports mode to approximate what
I'm talking about here, to force the camera to shoot with as high a shutter speed
as possible to freeze the action.
Now, let's turn this around to something
more in keeping with our goal of shooting pictures of SPs. Realistically speaking,
do you expect your subjects to move while you're taking their pictures? Probably
not. You don't really care what the shutter speed is. You could take the picture
at 1/1000th of a second or 10 minutes, and your SP isn't going to move either
way. So shutter speed is a nonissue. Aperture, on the other hand, IS an important
factor for this type of photography. Continue on with the lesson to see how you
use aperture to control your portrait photographs.
Depth of Field and Aperture
Previously
we talked about managing your shutter speed to control your photos' look. Now
we'll talk about situations - like shooting portraits of your SPs, for example
- when you would manage your Aperture.
To understand this, you need to understand
a term is called depth of field (DOF). DOF refers to how much or how little the
area "into" your photo is in focus.
Huh?
Remember, a picture
is only 2-dimensional, but you're still trying to capture 3-dimensional subjects.
So even though it's hard to tell in the photo, the varying distances of the subjects
to the camera influence how the picture turns out. How much of those varying distances
are in focus is the depth of field.
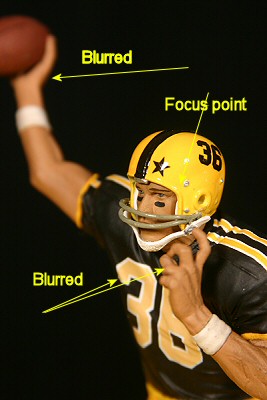
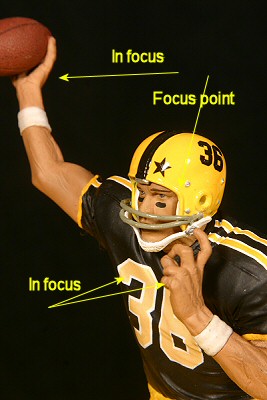
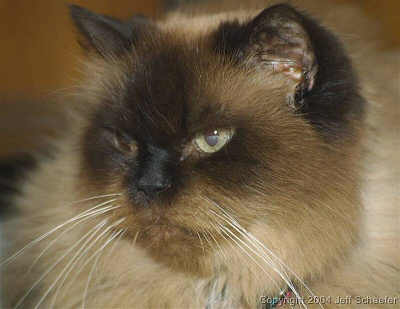
Look at the following picture.
I focused on the cat's closest eye when taking this picture. The DOF is so shallow
that one eye is in focus but the other isn't. This photo has a very small DOF
- anything closer than or farther than the focus point is out of focus.
OK,
let's see how this works. Let's say you had three figures you wanted to group
together in one shot. You may set them up like what you see in this graphic:
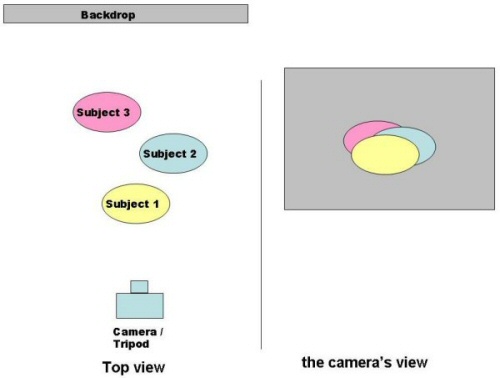
Looking
at the top view (left side), you can see how they're actually set up. What you
want is a really cool shot with all three of them in one shot, all close together
what is shown in the camera's view on the right.
As you look at this top
view, it is clear that subject 1 is actually closer to the camera than subjects
2 or 3, right? The difference might not be much (remember the picture of the cat?)
but 1 is closer than 2, 2 is closer than 3, and all three subjects are closer
to the camera than the backdrop. That is NOT as apparent when viewing the subjects
through the camera. You can't really tell how close the subjects are from the
camera's view.
DOF refers to how far into the picture is in focus. Meaning
- if you use a small DOF, only a very thin slice of the image may be in focus
while everything in front of and behind that slice is blurred. For example, with
a small DOF, you may only see subject 1 in focus. Subjects 2 and 3 are blurry.
Or maybe you focus on subject 2 and 1 and 3 are out of focus. If you increase
the DOF, maybe you can get Subjects 1 and 2 in focus - even though 2 is farther
away than 1 - and keep 3 blurry. As shown here:
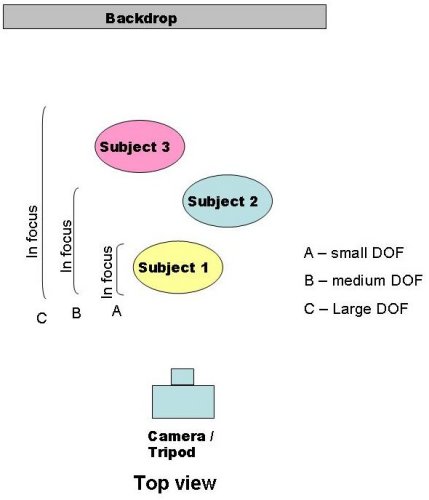
You've
got a bigger space into the shot to work with if you increase the DOF. With a
large DOF you can have all three subjects in focus and the background blurry,
or you can keep going and have everything in focus.
Here is an example
of the same picture with a shallow and a larger DOF - click either image for a
larger copy of the photo.
Now
that you understand what DOF means, you can see that the photographer can control
how far into the picture one can look and see a sharp subject - whether that range
of focused space is 1 inch or 10 miles deep. In a minute, I'm going to give you
several more examples of DOF so you really can see the difference.
With
that explanation of DOF we can go back to talking about our shutter speed and
aperture.
Remember, when shooting a moving subject, shutter speed will
normally control your settings. You use shutter speed to control whether moving
subjects are blurry or sharp.
You use aperture to control how large (or
small) your DOF is. This is an inverse relationship. If you
shoot with a large aperture - you open the faucet wide open to let lots of light
come pouring through all at once - you will have a small DOF. If you use a very
small aperture, a tiny opening of the shutter, your DOF will increase.
So
for pictures of your figures, you want to manage your DOF and you do so by controlling
your aperture. The aperture you choose will dictate what shutter speed the camera
chooses for the shot.
The settings for your aperture are called F-stops.
You may see F-stops referenced with the letter F and a number, like f2.8 or f11.
The range of F-stops you have at your disposal is driven by your lens and your
camera. A low number like f4 represents a large aperture (shallow DOF). A higher
number like f16 represents a smaller aperture (deeper DOF).
When DOF is
important you will shoot in aperture-preferred mode. (AV on your camera's dial)
When you choose AV mode, you set the aperture you want and the camera will automatically
calculate and set your shutter speed. Want a small DOF? Just pick f4 or whatever
your lowest aperture setting you can. The camera will figure out what shutter
speed you need. Want a bigger depth of field? Just run the f-stop numbers up to
f8, f11, f16 . . . the higher that number, the smaller the aperture - and the
larger your DOF. As you move up to f11 or f16 your shutter speed will get slower
and slower, because you're using a smaller aperture so the shutter has to stay
open longer. But don't worry - whatever f-stop you use, the camera will calculate
what shutter speed you need and set that for you.
(Note: Another factor
affects DOF - how much you're zooming in. If you shoot with a wide angle lens,
like a 28mm lens, your DOF will be larger. If you put on a telephoto lens like
a 200 mm lens, your DOF will be smaller. I'll show you a good example of this
below.)
Here are some more examples to show DOF. I'm going to provide
several examples because it's so important for you to understand how DOF works.
Look and see what parts of the photos are in focus and what parts are blurry.
Get used to paying attention to where you focus. If you have a shallow DOF, things
farther away and closer than the focus point will be out of focus - it's easy
to forget that. As you review these shots, you be the judge as to which works
better for each shot - there isn't a correct answer. It all comes down to what
you, the photographer, want to convey. The important thing to remember is, by
shooting in aperture priority mode, you have the control.
Click on any
picture below to view a larger version:
| Shallow
DOF | Larger DOF |
| |
1/40th
second, f5.6 | .3 seconds, f18 |
| |
1/60th
second, 5.6 (crop below) | 1/13th second, f14 (crop
below) |
| |
| |
|  |
| 1/13th
second, f5.6 | 1/8th second, f16
|
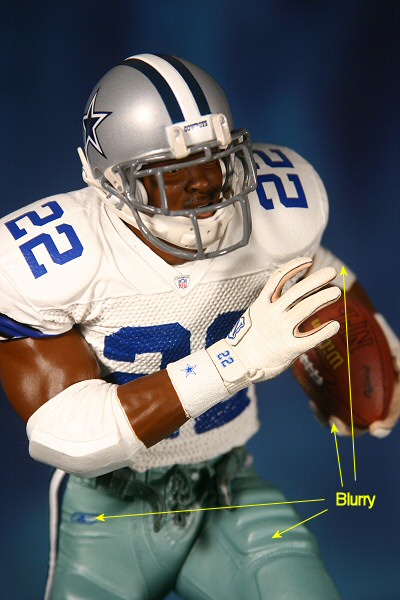
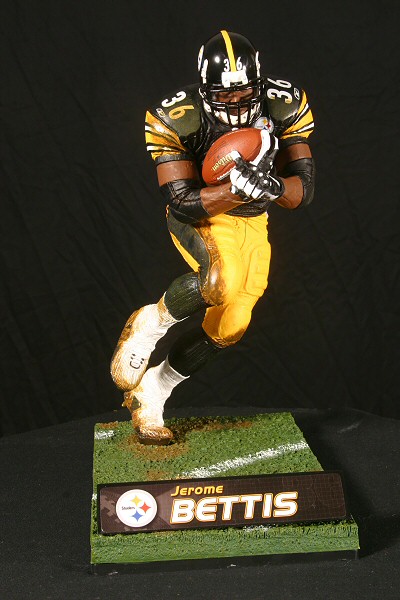
Not
much difference on DOF, right? About the only difference is the back of the base.
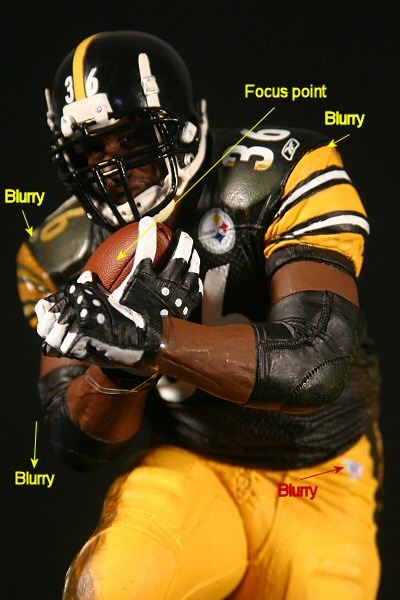
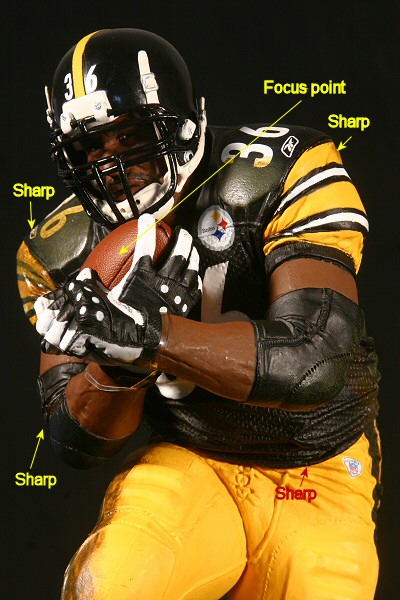
Now look below to see what happens when I zoom in . . .
|
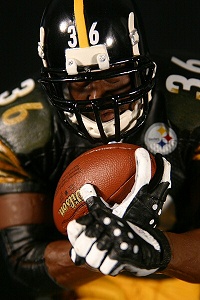 | 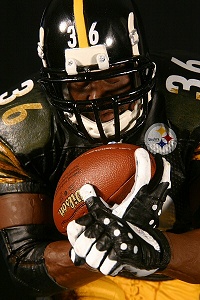 |
| 1/50th
second, f5.6 | 1/6th second, f16
|
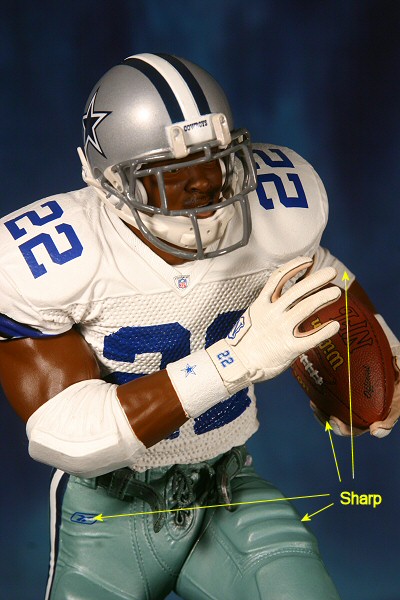
Big
difference on DOF here, simply because I zoomed in. Look at the knuckles, the
Steeler logo on the jersey, the 36 on the shoulder. Aperture plays a role in DOF,
but so does your zoom.
|
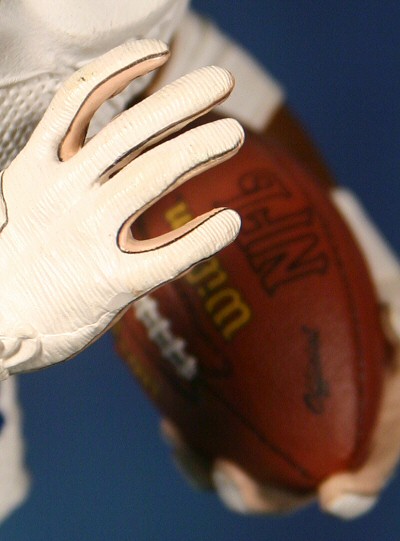
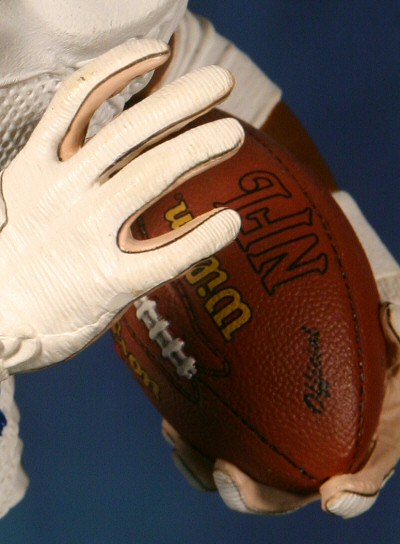
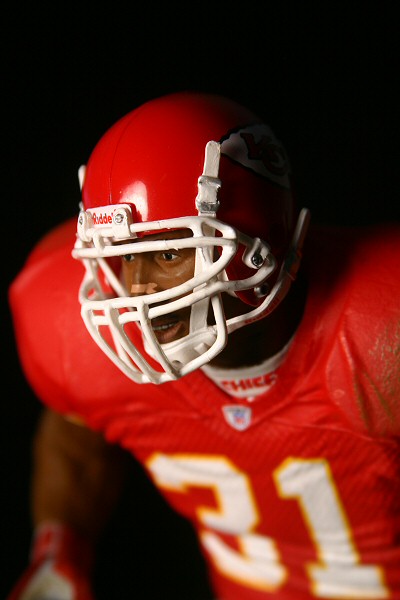
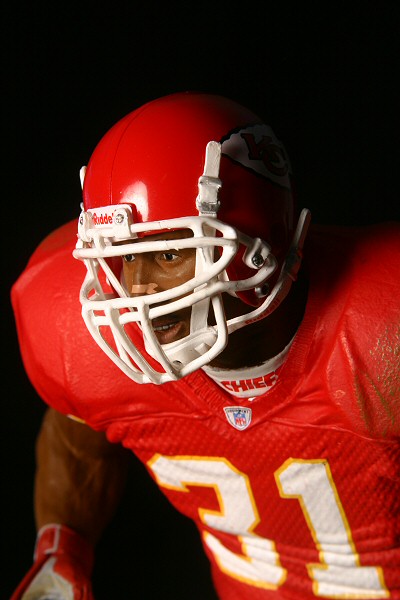
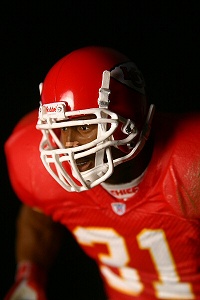 | 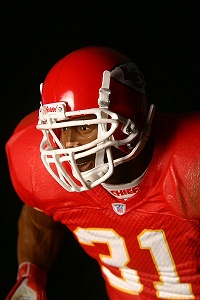 |
| It's
easy to assume that a larger DOF is always better. Not true. In this shot, the
shallow DOF draws attention to the figure's face. Clearly, the eyes are the subject
of that photo. The picture on the right is entirely in focus, so the viewer's
attention isn't driven to the eyes as emphatically. It's all subjective, but in
my opinion the photo on the left (shallow DOF) tells a better story here. |
Brief
review:
OK, now that you understand shutter speed, aperture, depth of field
and aperture, we're ready to talk about controlling your camera and using it to
get good pictures of your custom SportsPicks. Just a brief summary to make sure
you're clear:
- A good picture strikes a balance between shutter speed
and aperture. Using the settings of 1/1000th of a second with an aperture of f22
will give about the same exposure as you'd get from 1/60th at f2.8, but the pictures
may look very different.
- The subject matter determines which gets priority.
- If you're shooting a moving subject, shutter speed will drive your aperture.
Shoot with the camera set to TV. Pick the shutter speed you want and the camera
will set your aperture.
- If you want to control depth of field, aperture
will drive your shutter speed. Shoot with the camera set to AV. Pick the aperture
you want and the camera will set your shutter speed.
- You can further control
your DOF by controlling how much (or how little) you zoom in with your lens. The
more you zoom in, the smaller your DOF.
- When in doubt - Bracket!!!
What
about people whose cameras don't allow them to control their aperture or shutter
speed? Most digicams have a poorman's substitute for this. If you look in your
manual, you'll find different shooting modes - sports, landscape, portrait, etc.
For doing portraits of your SPs, try setting the camera in portrait mode to force
it to shoot with as large an aperture as possible.